You will require this information if you are looking to create an event, or edit one.
Step-by-step guide for adding tabs to events.
- Navigate to the event that you would like to add more content to (ensure that you are logged in).
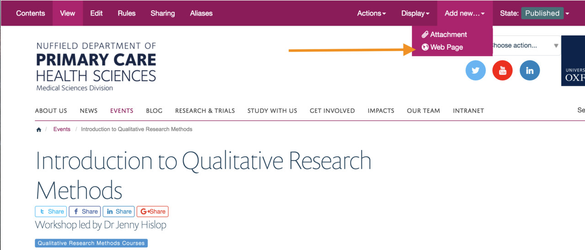
- Once you are in the individual event, use the 'Add new' menu to add a 'Webpage' to the event.
- You will be taken to the edit interface of the webpage, and simply create this page as you normally would. NOTE: You can use the 'Image' field as well, as this can be shown in the tabbed content.
- Save the page that you have created, and you will be taken to a 'View' page of it.
- Navigate back to the original event, using the breadcrumbs on your website.
- Click 'Edit' on the event that you have just added the extra webpage to.
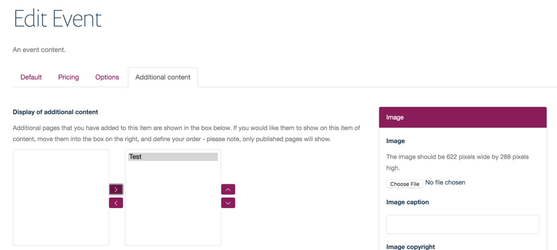
- You will see a new tab 'Additional content' select this tab.
- On the 'Additional content' tab, you will see 2 fields:
- 'Display of additional content' this field comprises of 2 boxes.
- The box on the left, will show the additional pages that you have added to the event and are then available for use as tabs.
- The box on the right, is where you move the pages to, if you want them to show as tabs under the main content of the event.
- So, to show an additional webpage on a tab, move it from the left box to the right. Please note, the page will only display publicly if it is published.
- 'Display of additional content' this field comprises of 2 boxes.
| Info |
|---|
Related articles
| Filter by label (Content by label) | ||||||||||||||||||
|---|---|---|---|---|---|---|---|---|---|---|---|---|---|---|---|---|---|---|
|
...

